Pages

Sunday, April 29, 2012

The Disappearing Lady

So anyone who reads my blog is probably wondering where the heck I've gone. The answer is hell. Seriously! I can only describe the last week as blissful. Day 1-5 of being on antibiotics immediately got rid of the chills, lethargy and hacking cough as well as the runny nose of doom. Day 6, I knew we had a problem because I had a runny nose. Day 7 the cough came back. I'm now two days past my antibiotics (they are all done) and I am truly right back where I started, complete with puffers not working, near asthma attacks daily and green as far as the eye can see. It sucks. So today I went to the walk-in, and, living in Smalltown, Ontario, they told me to go home and they will call when it is my turn. Heck ya!

But being sick and a DIY bride do not go hand in hand, especially when we are now less than three months out from the wedding! Eep! Yesterday I managed to put together my sister's invitation, as she wanted the work for her portfolio since she has a job interview Monday. I also managed to make these beautiful bags for my bridesmaids:


Beautiful, eh? The great tutorial I got on how to do these was found here: http://ashleyannphotography.com/blog/2009/11/21/diy-doily-canvas-bag/ Being in Canada I used coupons and $12 bags from Michaels, but you get what ya get! My only advice, less is more when it comes to paint, or put a newspaper between the layers so you don't get paint all the way to the back. Oops!

I also managed to get some rocking stamps for my invites. I had the choice between using three daylilly stamps or two daylillies and an ugly 7 cent stamp, so you know I am paying the extra $0.50 per invite. I'm insane. Here they are though...

Finally, Mr. Sunshine has been getting increasingly annoyed with the wedding room. Probably because it started out as a guest bedroom/junk room (we moved from a large 4 bedroom house with a basement to a small 2 bedroom house with a crawlspace) and has now become the guest bedroom/junk room/Miss. Sunshine's teaching stuff until the beginning of June when she can move it to her new school/wedding supplies/crafting supplies room. Needless to say he put his foot down and insisted we clean up! We flipped up the bed, are getting rid of the extra boxspring, cleaned out some junk and then piled boxes as high as the eye can see.

The view from the doorway. At least there is a path now!

It's like a pie-- mattress crust followed by teaching stuff filling, capped off with wedding supply boxes

Notice how nicely my teaching books and binders are shoved haphazardly into that bookshelf?
Well, the walk in just called which means it is time for antibiotics! Yay!

Until next time,

~Miss. Sunshine

Friday, April 27, 2012

Heatlhy fail

I don't even know how this is possible, but this is the life of Miss. Sunshine, Kindergarten teacher.

I am on antibiotics for a head cold turned sinus infection turned lung infection and haven't sniffled in almost a week. I came home last night with a fever, runny nose and cough-- WHILE ON ANTIBIOTICS!

Anyways, after 11 hours of sleep (oh god that's sad), I'm feeling 80% and hoping that by the time I go home I will be at no less than 50%. I'm planning on loading up with dayquil and then bringing decongestant and tylenol just in case the dayquil wears off.

Anyone else manage to have these things happen?

~Miss. Sunshine

Wednesday, April 25, 2012

A Day at Court

Yesterday and today have been so strange! Yesterday Mr. Sunshine was telling me about how he was talking to someone at work who told him off for not helping with the wedding. I think the exact word was "uninvolved". He made up some lame excuse about me having it under control, but I think it got to him enough that a few hours later this is what happened:

Me: *addressing RSVP envelopes*
Him: (from the couch) Hey.... whatcha doin?
Me: Addressing RSVP's. Almost done! I only have about 15 more to go!
Him: Um... do you need help?
Me: Sure!
Him: I might screw it up
Me: That's okay, because it erases if you make a mistake.
Him: Um... okay then... *sits across from me at the table* How do I do this?
*** I show him how to trace the address over the carbon onto the envelope ***

So I'm all excited because this means I might have help for addressing the return address and regular addresses on our envelopes and all sorts of other things when I hear this.

MY HANNNNDDD HURRRTTTS!

So I look at him and go, "What do you mean your hand hurts! You've only done ONE! I've done 30!"

I guess he feels bad so he does another, whining the entire time that it hurts his hand so bad, asking why I'm doing this, getting mad at the paper and envelopes, etc.

So I told him to go watch tv and finished them myself.


Sometimes, it's just not worth it!


In other news, today I had to go to court (oooOOOooo) because I witnessed a car accident back around January 5th (oh). I had to be there for 9, got there, waited and waited and waited and then at 10:30 I talked to a cop who was hanging around and asked him how I know when it's my turn or what is happening. He tells me to go talk to the prosecutor during the break, so I thank him and the break starts. I go in, the guy plead guilty and I got to go home!

I think the best part is that the cop who dropped off the subpoena at my house in February suggested I take the entire day off because sometimes these cases can become extremely long, and in other cases they are settled before they begin. Needless to say, I wasn't complaining!

You'd think that with all this time I'd do something wedding related, but no. That certainly did not happen. I am sick of addressing things, so that is at the bottom of my list right now! I do, however, have to go back to school for 6pm or so because they are doing a musical and I volunteered to supervise a bunch of 7 year olds. I figure I'll go to Michael's, get some DIY stuff I am lacking, visit the post office, and slowly make my way back to work.

Ahhh, the hard life ;)

Anyone else doing some fun projects recently or thrilled a difficult or tedious one is over?

~Miss. Sunshine

Tuesday, April 24, 2012

40 more what?

Quick post, since I am trying to do one daily and I am in a huge rush today!

Snowstorm update: We ended up with 8 inches on the back deck last night and it mostly melted today, but is snowing again.

Also, finished all my invitations and main envelope liners, cut out the envelope liners for RSVPs and designed and typed out the addresses for our invites.

So then I go to write out a few invitations and I realize the worst-- I not only have to write out 36 addresses, but I also have to REWRITE our address 36 times on the back flaps of these envelopes.

My patience level is currently at negative ten. GRRRR!!! Maybe I'll start a mad dash tonight and try to get the rest of the RSVP's addressed. Tomorrow I'll go to the post office and pick up stamps and then I can start handing things out. Yay!

~Miss. Sunshine

Monday, April 23, 2012

Snow, Snow, Snow!

Today was back to work day and man was it a weird weather day! I mean, I live in Ontario, so I know that we get weird weather once in awhile, but today started off so strange.

First it was chilly and windy.

Around 10 it started snowing this weird slush.

Around noon it started pouring rain.

At 3 I left for home and encountered this:

Two inches of snow on our table and still going strong!

Yep. That's our patio set that we put out. Ironically we were outside in our t-shirts yesterday afternoon with Mr. Sunshine fixing the lawn mower and doing some yardwork!

Anyways, in feeling the rush to get these invites done by next weekend (no worries, I'm laughing with low expectations too!), I have made a set of lists for getting this work done and completed, starting with finishing the actual invitations today by gluing in my remaining 7 pocketfolds for invitations. These poor 7 invites were left on their own and are now in desperate need of a good pocket! Originally it was because I screwed up 7 pocketfolds and didn't want to make new ones, but hey, we learn. Also by Friday I am determined to finish my envelope liners for the main envelope and RSVP's, number the RSVP's by guest, and finally address the remaining RSVP's. Will it happen? Perhaps not, but certainly worth a try.

 In other news, check out this flowchart on DIY's. I know you'll enjoy it!
Click to enlarge!


~Miss. Sunshine


Sunday, April 22, 2012

Envelope Liners-- DIY

Once again I sat down to conquer a task a week ago and got to it today. Don't even ask how long addressing the RSVP's is taking *sigh*.

Anyways, for your pleasure and amusement... DIY Envelope Liners!

You Need:
-nice, thin paper (I used a rice paper)
-dry glue roller
-sharp scissors
-pencil
-envelopes+ 1 extra
-ruler or straight edge
-paper cutter (if you are lazy like me!)

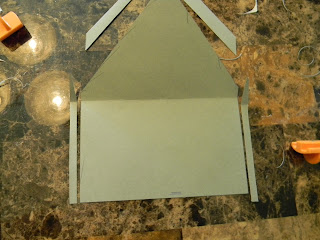
The pieces of this puzzle.
Step One
Take your spare envelope and cut a thin, thin strip down each side so that your envelope folds apart. Mark where you want the envelope liner to go down to (I put it about an inch below where you can see it) and using your ruler or paper cutter, cut straight across. You can see in my picture where I used a pen to mark a quick guideline for where I wanted it to be below. Next, cut about 1/4 inch off each side of what is left. You will not want the envelope liner to touch the edge of the envelope. Finally, cut off the "glue" at the top. Tada! Perfect template!


Step Two
Super lazy man's way to do anything wedding related.
Trace out the envelope liner as many times as you need and I would suggest roughly cutting them out. On a 20" by 30" piece of paper I am guessing I will get about 20 liners for my 5.75" by 5.75" envelopes. I finished off my cutting by using the paper cutter and then rounding the top with my scissors. Super simple and very quick and easy.


Yeah, nail. You sexy foldin' that liner.
Step Three
Grab an envelope, liner and the dry glue roller. Put a line of glue just below the fold crease where it is visible when the flap is open. Carefully (so carefully!) puff open your envelope and slide in the liner. ENSURE THAT THE LINER IS RIGHT SIDE UP *oops!*. Line up the liner with the glue line on your envelope and carefully press to secure. Fold the flap back and put another triangle of glue around the glue line where your liner will touch. Carefully press to secure. Fold your flap back halfway and use your nail or, for the fancy fellows, a boning tool to create a proper crease. And that's it!


Super simple. Tips and tricks I have figured out:
  1. Make sure you trace on the BACK of your paper. That way if there is a small pencil line left, no one will see.
  2. Ensure you have a sharp blade on your cutter.
  3. Putting the glue both directly above and below the fold will decrease wrinkling significantly.
  4. Some of your envelopes will have misplaced glue, forcing you to choose between going directly beside the glue or over the glue. Make a choice and make it well.

For those who are curious, one "before and after" picture.
Before
After


I agree. It's so much nicer :)

~Miss. Sunshine

Engagement Photos and Concert Wonder

Wow, let me start off by saying that yesterday was insane. I truly believe that is the best way to describe just how weird it ended up being!

First off, we were wondering most of the morning if we would have to cancel our engagement photo shoot. We really didn't want to, because it was halfway to our concert and a great way to spend the afternoon, but with the morning consisting of random shower activity and high winds, there wasn't much hope. Thank god around 11 it all cleared up and left us with a nice cloudy sky-- perfect picture weather, right?

NO! It was SO cold. I would make a good guess that it hit a high of 7 or 8C with wind that was beyond cold at times. Pair that with a cute dress and a light half-jacket and I was shivering most of the time. Was it worth it though? YES! Our photographer took us so many places. We have pictures from two old barns, a corn field, abandoned rail way cars and tracks, as well as a cool field/fishing hole. I'm so excited to see a few!

After our photo shoot we defrosted in the car and headed up to our concert in Orillia at Casino Rama. I have to tell you, I've been to a few concerts, and I'm really not a huge concert person. I find they are loud, the performers are arrogant and the songs are played with some boredom. Clearly I'd never been to a country concert before.

But backtracking, just a bit, Mr. Sunshine's friend works for the local country radio station and happened to be at the event. He was given a few extra tickets and upgraded us from nosebleeders to 8 rows back, almost centre stage. It was incredible. I love that man. New favourite person.

Seriously.

Okay, back to this story. So we sat down and out came Kip Moore. He sings a few songs, but most people only really know his latest, "Somethin' 'Bout a Truck".

 Somethin' 'Bout a Truck

First off, he is really nice to look at, secondly, he could sure sing! Beyond that, every one of the back up band members, himself, and anyone who ran by the stage was smiling and having a great time. I was shocked and loved it! He had the audience join in, was giving anyone who ran up to the stage high fives and such, and was really friendly. His set was short (like 3 songs short!) but then came David Nail. I was thinking, no way that this guy will be the same and he was!

Feel free to fall over in love with this blue-eyed beauty. Kip Moore is so sexy!
 Finally, the showstopper, Billy Currington *swoon*. He came on and was great! He even brought his dog, Paco, on stage for when he sang "Like my Dog" who was a super cute chocolate lab. So an hour and a half of amazing songs later, it was over! Of course he stayed on stage and signed a few autographs so Mr. Sunshine and I watched a bit and then decided to run and see if we could catch a shuttle back to our hotel. Well, lemme tell you, 15 minutes after his last song he was still signing autographs and then we saw Kip Moore just hanging out in the lobby taking pictures and signing autographs too! I couldn't believe it!

 Nobody loves me like my dog does baby!

So my weekend, as you may have guessed, was incredibly amazing. There is nothing I can regret at all. Even our 1.5 star hotel that was the cheapest in town at $69 a night, ended up being better than most of the econo-lodge's and Holiday Inn's I've stayed in! I'll give credit to the family that runs it, who were very attentive all night and have managed to keep the hotel size reasonable at only 20 rooms.

How did you spend your weekend? Have you even been to a concert that blew you away?

~Miss. Sunshine

Saturday, April 21, 2012

Engagement Pictures and a Concert!

Man I am SO EXCITED FOR TODAY!!!

Our photographer has extended our engagement session from 1 hr to 2+hrs, we are shooting at two locations I am really excited about and I have a few adorable outfits to wear! Yay! Besides this, tonight Mr. Sunshine and I are going to a great country concert, that we know will kick butt and take names!

At this point I have repainted all of my nails, at different times, at least twice. Most of them look normal now, but god do I hate DIY manicures! I read a few places that you can now by at home UV light kits which make the nailpolish dry as hard as a rock almost instantly. I seriously need this. Last night I fell asleep with my left hand under a pillow 2 hrs after painting my nails and woke up with lines through them all!

Besides all that, we are getting ready to pack up right now. I have to do my hair and makeup as well, but I am going to hold off another hour and a half to give that nailpolish the best dry I can before I completely screw it up again. Sneak peek pictures will be posted soon!

Friday, April 20, 2012

Why I'm not a girly-girl, aka, the nailpolish disaster

I am NOT a girly girl. I can probably count the number of times I have painted my nails on both hands, and I am almost 25 years old!

That being said, tomorrow is our engagement pictures, so of course I want my ring finger hand to look nice. Not wanting to spend $30 on a manicure, I decided to DIY.

God, WHY?

I took today off because I'm still not breathing 100% and running around after 30 four and five year olds, that can easily become a problem. So what did I do? 9 am, I busted out the polish.

Love the colour!
 So I put on my clear coat at 9 am on the base. I waited 30 minutes and put on the first coat of mauve polish, then waited 15 minutes and did the second, waited 15 minutes and did the top coat. Just after I put on the top coat my nail snags on the blanket I have on and THREE NAILS are ruined. Two on my left hand. SOB! I bust out the nail polish remover and start again on those three nails. One gets hit by the bottle and do that one again. 10:45 I have finished me effing polish.

The good news? It looks okay! The bad news? I polished almost all my cuticles and around my nail and have brush strokes. Oh well. Just as a sneak peak, it still looks okay, at least I think it does...

You know you love that ring!

And done :)

~Miss. Sunshine

Thursday, April 19, 2012

DIY Bouts

I went to work today and left at lunch to procure some medicine. I fought the cough and the cough won and kicked my ass on the way out. After a quick (I love this city!) visit to the walk-in clinic, I left with a better inhaler and some antibiotics to get rid of the remainder of this cold.

Anyways, now that I can breathe properly, I am bored and thought, what better way to start this afternoon than to get going on the bouts that I am HATING. I have made over 10 mock ups using a variety of different leaf/flower combinations and techniques and have hated them all. After reading a few more tutorials on how to do bouts using silk flowers, real flowers and even fabric flowers, I figured I'd give it one last go and came up with this...

So purdy!
I am so impressed! Hey-a bout, wanna go for a ride? *wink*. Anyways, it currently is made from better quality hydrangeas than those in my bouquet (although for 6 times the price per stem, they look almost identical), as well as the leaves from the peonies I used in my bouquet and I love it! This one is for Mr. Sunshine, so it has some pearls to match the necklace and bracelet I made for my dress, as well as the pearls on my veil.

So I figured after all the damned trouble I came up with, I  would make a tutorial for the next poor sucker who tries this...

What You Need
  • hydrangea flower
  • large leaves that you think look good as a background
  • pearl and fishing line flower decor thing (no idea what it's really called, clearly)
  • floral tape
  • wire cutters
  • sharp scissors
  • 20-24 gauge wire (something thick enough to be strong to hold up the stems, but easy to wrap)

The how to part...


  1. Cut a few flowers off your hydrangea. You want to leave as much of a "stem" as possible to allow for a good wire wrap. I used 4-5 blooms for my bouts.
  2. Cut 4-5 pieces of wire about 6 inches long.
  3. Wrap each stem with a piece of wire until the wire and stem are quite secure. To make mine secure I first bent the wire into an L shape at the end and lined up the L with the stem. I wrapped around the L and the stem at the same time to ensure that the wire was firm, then tightened what needed to be tightened with my beading pliers that have a nice flat edge to them.
  4. Bunch the flowers the way that you will want them to sit in front of the leaves and then carefully twist the wires together into a big bunch. I used pliers to tighten the wrap to ensure that the wires were firmly held together, and then trimmed the ends to about 4 inches long.
  5. Wrap the entire wire/flower thing you have in floral tape, covering up all wire. I would suggest starting at the top of the piece and working your way to the bottom, and then wrapping it back up to the top for extra strength.
  6. Position the beads on the back and wrap onto what you have made in step 5.
  7. Position the leaves on the back and wrap onto what you have made in step 6.
  8. Tada! You are done! To finish it off, add a dab of glue at the bottom of the floral tape and wrap the floral tape in a nice ribbon to hide the ugly green.


While that might NOT have helped, I hope it gave you some hope for what can be accomplished! Here is a final picture, just in case you want to see what two crap and one great one might look like...

Crappy, AMAZING, and okay looking bouts.

~Miss. Sunshine

The Lunch Lazies

I am a lazy lunchtime maker. Anyone else with me here? I am also incredibly cheap, so I cannot justify going out and spending $5-10 a day on lunch. If you think about it, I work 180 days a year. If I buy lunch every day that is almost $1000!!! Not including gas, snacks for before or after lunch (I run around all day, it's necessary!), etc.

The biggest problem that comes out of this is that I am just about the laziest person when it comes to making lunches. I'm not sure which I'd prefer doing, but I'd likely rather fold and put away 10 loads of laundry than make a lunch. It's stupid, I know.

When I lived on my own, that problem was solved by being forced to cook everything in too big batches, and having copious amounts of leftovers. I don't even want to tell you about my roast beef fascination which once led to almost a week of roast beef for every meal, although the two pots of soup was much worse (what was I thinking!?). Living with my amazing Mr. Sunshine, I feel bad making such a huge amount of something that we would eat it every meal for a week, so we tend to make normal meals with leftovers 50% of the time. This means that 50% of the time I have lunch and 50% of the time I have to make a lunch. It's like torture in the morning!

The good news is my lunchtime laziness cure-- other people's laziness and need for a fresh and fun meal once in awhile! Does your child participate in pizza days, hot dog days, lunch days? I can guarantee you, I do too! One of our staff members brought an idea from her last school which is salad club. Once a week you bring a topic (and rotate through bringing lettuce or bread) for salad and you get a huge salad once a week that is really filling and delicious for cheap! This is great because it truly involves simple things like buying croutons, bacon bits, mixed nuts, chopping down chives from the garden, or even grabbing dried berries, and no prep!

I write this because at this moment, in my extreme morning laziness, the last thing I want to even consider is packing a lunch. Being our salad club day, all I have to do is grab some wet paper towels and scissors to cut some chives from the garden and *shabam!* I'm done. I'm so grateful right now!

Ohhh the good life...

~Miss. Sunshine

Tuesday, April 17, 2012

The labour of love...

I keep hearing that saying about invitations. They are time consuming, but it is a labour of love! You want to show everyone how much you love them and you spend hours and hours perfecting their first real taste of your wedding.

Honestly, at this point I am stuck between "It's mostly done anyways", "What short cuts can I take" and "Why didn't I just go to Michael's and buy a DIY kit!?!"

I think I've already done an hour by hour recap of how long everything has taken, but minus faux-lligraphy and envelope liners, the completion of 33 invitations has probably taken around 35 hours, including silly things like spending three hours looking at paper. It's effing pathetic. I have 6 more pocket folds sans pocket or cover to complete, and a "completed" invite at my parents that is in need of some E-6000 to keep the pocket in place. Guessing that envelope liners for 40 RSVPs and 40 outer envelopes will likely take another 6 or so hours, another 2 hours to complete the remaining 7 invites, and likely close to 10 hours to faux-lligraphy on everything... and... well... it's depressing! I guess it could be worse. It could be 100 invites!

Tonight I am taking a break. Partially because Mr. Sunshine was wondering why I don't hang out with him since I've started tackling invitations, partially because I am tired as all heck from being up all night coughing with this cold, and partially because I ran out of glue tape, which was a great sign from above to put it down and take a day off.

So tomorrow, being another day and armed with glue, I am determined to finish the last six pocket folds, glue the covers together, and faux-lligraphy another 10 envelopes! I have finished 7, so only 33 more to go!

Anyone else feeling bridal burnout? Any other people taking the day off of preparing for something?

~Miss. Sunshine


Monday, April 16, 2012

Addressing RSVPs

Wanting to be a perfectionist, because I seriously cannot do anything without it being perfect, I decided to learn how to do calligraphy JUST to do my invites. Seriously did. It took hours upon hours of practice and I managed to have a decent hand at some alphabets.

So what did I need next? A good calligraphy pen with a super fine nib. Insert massive failure here! I couldn't get a nib small enough and once I did it snapped with barely any pressure on the page! I was so mad. I then decided I would go the "cheating" route and do faux-lligraphy. Be prepared, because the tutorial is coming up....


NOW!

Amazing Faux-lligraphy
By Miss. Sunshine

The first step, of course is to find a font. I ended up stumbling across http://www.dafont.com and picked out three fonts I loved. The second step was to figure out how to install it when you have Word 2007! Thank goodness for the ease of this tutorial gem: http://www.geekstogo.com/forum/topic/195151-add-a-font-on-microsoft-word-2007/ it was very, very simple!

And so I managed to create this with my favourite three fonts...

So pretty!

The big problem here was how to get any of these onto a fricken invite! Most people use a light table or some sort of light/glass rig, but my envelopes are so thick this was not a possibility for me. Not even in the least. So after a day at work randomly thinking about it I got this "aha!" moment!


I'm such a genius! For those of you who have never used carbon paper before, it's that weird black paper that back in the good old days was used to make second and third copies of something. Before FedEx and Canada Post did everything electronically, you had to fill out forms on this and press hard-- reallllllllly hard. Anyways, I thought that this would be the best thing to used and it was amazing. 

My only tips:
1. Practice on a piece of paper first. Getting the pressure right is key. Since you don't want to see the lines really dark on the invite, you want to press softly. How softly you need to press will be dependent on the paper you use and how "used" it is.
2. Do NOT rub your fingers on this and then touch your invites. You will cry. I promise.

Anyways, to make it easy for positioning and such I then killed a few trees by printing off different spacing in boxes and font sizes until I came to the perfect combination.

Many trees were harmed in the making of this labeling system.

I then took the carbon paper and cut out a smallish piece, cut out one of my labels and grabbed an envelope. Tip number three-- there IS a top and bottom to an envelope. Make sure you check before you write.


I placed the carbon paper dark side down onto the envelope and positioned my label as perfectly centred as I could...


Then, I carefully and lightly (have I stressed that enough yet?) traced over my printout. I could not take a picture of the traced lines because they were that faint. Seriously. I mean, it could also be because I put gray onto gray but such is life!

My tracing skills are incredible!

As you can see, quite some time later I now have three done. Yep. Three out of 40. I think this is mostly because simply doing one involves cutting out a small paper, positioning it on carbon paper, carefully tracing it onto the invite, then taking it off and retracing it with a super fine (0.5mm) black gel ink pen, and finally putting it to dry without smudging. It will certainly be a long night!

Three done... of 40.
Any project conundrums you've solved? This has been my biggest "aha" so far, I believe, but I'm sure there will be more!

~Miss. Sunshine

Sunday, April 15, 2012

DIY-- Making my own flowers

As you might have gathered from previous posts-- I am cheap. SO cheap! So cheap, in fact, that when the quote for my flowers came (1 bridal bouquet, 2 bridesmaid bouquets and 4 bouts) and was around $500 including delivery, plus taxes, I almost fell over dead.

HOW CAN FLOWERS COST SO MUCH!?!

So today I revealed this tidbit to my mother, who insisted I should just use fake flowers, like she did at her wedding. Now, I had considered this in the past, but I was on the "well real flowers look better, but cost so much more" fence. Today, however, Michael's had 60% off many of their flowers, and I was in desperate need of silver acrylic paint, so I figured I'd give it a go.

So you, dear readers, will be the first in the world to see my not-yet-complete flowers and soon will see a tutorial. The total time to create my bouquet was less than an hour, including about twenty looks in the mirror just to make sure it was even. I'm telling you now, doing this in front of the large mirror in our dining room was an awesome idea.

And now, the reveal!

Bridal bouquet. I am thinking I will add some greenery interspersed to add some colour and a 'pop'.


Idea for bridesmaids. Much smaller with only three large flowers and perhaps some greenery.


The disaster that is my wedding table and also the dining room table. Mr. Sunshine loathes this mess.

So all in all, because I took advantage of Michael's 60% off sale, and teacher discount (another 10% off), the cost of flowers was $24.93. Beyond this, I had to buy floral tape ($3.36), and will have to buy some nice straight pins, ribbon and some greenery (appx $20?).  With a total cost coming to be about $50, I am more than happy spending less than ten percent of real flowers!

What have you saved money on? Any hidden talents revealing themselves to you?

~Miss. Sunshine

Saturday, April 14, 2012

Cleaning Spree and Missing Mr. S

Mr. S and I haven't spent any time together since Wednesday. I'd love to blame Mr. S or myself, but it was really just a matter of schedules. In the morning he leaves at 6 for work and I get up just after he walks out the door, so the mornings are a bust. On Thursday this week I had parent council until 9:30 and he was almost asleep when I got home and then yesterday he worked overtime and I was asleep when he came home. This morning Mr. S did even more overtime, so I didn't get a chance to see him until 1:30, then he napped, and finally we have together time.

As much as I missed the poor man, I loved all that I was able to accomplish with him gone today! Here's my schedule...
7:30-8:00: Wake up, make coffee, put in a load of laundry.
8:00-9:30: Drink coffee, continue flipping laundry, play Mario Bros obsessively, screaming at the tv when I die
9:30-9:45: Get dressed, fold some laundry, brush my teeth.
9:45-10:30: Take puppies to the vet for heartworm test and medication. By myself. Did I mention J is now 79lbs and O is now 72 lbs? That's a lot of dog for one sick girl!
10:30-12:00: Play Super Mario Bros. (I seriously have a problem right now...)
12:00-1:00: Dishes, laundry, fold laundry, put laundry away, vacuum, tidy.
1:00-1:30: Super Mario Bros. (I told you!)
1:30-2:00: Eat lunch with Mr. Sunshine.
2:00-5:00: Watch Independence Day while Mr. Sunshine sleeps and do sporadic cleaning that I can do near the tv.
5:00-6:00: Watch tv and make dinner.
6:00-7:00: Finish cleaning, kill ants, kill spiders, go on computer.
~Projected that 7:00-9:00 will be cuddling and watching a movie together. Ahhh, romance....

Did you read that last part? Kill ants? I have to tell you about this. I went to go on the computer around 6:45 and I notice this weird black marks on the carpet. I walk over and they are ANTS!!! Big, black ants. In fact, about 30-40 big, black ants! I screamed to Mr. Sunshine and he helped me stomp them with a shoe and suck them up with a vacuum. Our newest delimma is how to kill the damned ants that return without killing the dogs. Unfortunately O really enjoys eating ant traps.

Another day in the life...

~Miss. Sunshine

A time to be sick

There is no good time to be sick, but there are certainly worse times to be sick. I thought this weekend would be one of them, but everything is working out somehow!

It all started last week with my fever making cheesecake. If you read back you can see how I was jacked up on tylenol trying to get it done right and still failed-- mostly at least. Well this week I went back to school and my sinus infection took a nasty dive into my lungs. Having athsma, it has not been pleasant.

Yesterday I left work at noon, carefully listening to the hacking coughs of three of my students, knowing I was going to be in bigger trouble if I didn't get to a walk-in clinic and rest. Living in a one-horse town, the walk in was closed for Orthodox Easter. My options were to drive 30 minutes back to the city I just left and wait a few hours at a busy walk-in, go to the ER for antibiotics, or just go home. I opted for the latter.

So yesterday was spent hacking up a lung. Today has not been better. I feel like death hit me with a Tonka truck! Runny nose, coughing, fever-- you name it I likely am feeling it.

So then comes the good news! This weekend was supposed to be when we get our Engagement Pictures done, but it is supposed to rain off and on today and thunderstorm on Sunday when we are scheduled. No good for an outdoor shoot. The photographer asked if we wanted to move it to the 21st and tons of problems were solved as other adventures were created!

Mr. Sunshine, being the lovely man he is, for some reason failed to mention to me that when we go to see Billy Currington in concert next Saturday, we will need to stay overnight because the concert will not end until 11 or 12 at night and it is a two hour drive home! So I quickly sourced a cheap hotel and booked us in. This worked out really well because our photo shoot for the same day is exactly halfway between our home and the concert! So next weekend we have an adventure on our hands! This also gives me one more week to shape up and get rid of this horrible cough and chest infection.

And now... off to the vets on my own with two large dogs for heartworm tests. I really can't complain because Mr. Sunshine worked from 6-3 and 5-10 last night and is working 7-11 or so today. I just wish I didn't feel so gross.

~Miss. Sunshine

Thursday, April 12, 2012

Top Ten Things... I learned DIYing it

The first of what, I can only assume, will be many top ten lists.

And in no particular order...

1. Take how much time you are willing to spend on a project and write that number down. Write down how much you will pay and how many trips you are willing to make to the nearest craft store. Now double all those numbers. Now triple it. Is it still worth it?
2. A mock up always occurs more than once.
3. If you start a DIY too early, you will likely find an even better DIY project later on and throw away your first idea.
4. You will make a mistake. At some point you won't care anymore and find the fastest way to fix it, even if it doesn't look amazing.
5. If you are a perfectionist or have an idea of what you want it to really look like, do not recruit friends. You will end up annoying your friends and redoing all of the work anyway.
6. Never, ever, attempt a DIY that requires writing in front of the tv or a good movie. At some point you will make a mistake and have to start again.
7. Your Fionce will think you are crazy for wanting to repaint that cream coloured frame eggshell white. Other women who are not engaged are just thinking it.
8. If it looks simple enough, it is actually really, really, really hard.
9. Anything Martha Stewart can do in an hour will take you a day. Trust me on this one.
10. At some point, somewhere, you will be doing a DIY for the third time over and realize that Michael's sells the same thing pre-made for about 10% more than what you are paying. With their 40% off coupon, it will be 30% less what you paid, it will look perfect and you won't have to do a fourth take. No matter how proud you are of your horrifying work, just buy the damned product and throw yours away!

~Miss. Sunshine

DIY Fail Begins

Now, I have done many, many long DIY's for this wedding and virtually all of them have failed at some point. My veil, after hours of beading strands of fishing line and then painstakingly sewing it to my 9 ft veil, had the beads falling off. My table numbers had pencil lines showing through. And now my invitations are falling apart!

That's right-- falling apart. *scream*! And probably because I'm cheap.

The whole story here is that I wanted to save some money on these invitations that have ended up costing me about twice what I thought they would. To save money, I decided to use a glue roller from the dollar store instead of the $10 glue rollers from Michaels. From experience, I knew the quality was about the same. It sure has got the paper stuck to the invite, with no hopes of it every being ripped off! What I didn't count on is that the pocket folds would have a lot of pressure put on them from the inserts behind the pocket.

So two days ago I went to put a cover page on my invitation and the pocket fold I had loving glued in the day before fell right out of the card. I screamed. I threw it across the room. I put my head in my hands and tried not to cry. I regrouped, jumped online and saw that my sister was right-- I needed rubber cement.

Well, yesterday I had to run to a pet store at lunch to grab a screen for a tank in our classroom (we should be getting our caterpillars any day now and we don't want those suckers escaping!) and Michael's was next door. Perfect chance to get the right glue, especially since a co-worker of mine said their glue was buy one and get one half off and she needed rubber cement too!

Ha.

This particular Michael's was sold out of the small size and only have the fifteen dollar giant bottle left. I was so mad I decided I would wait until I got back to my hometown and look at the local Walmart.

Just for the record, they don't sell rubber cement. I will save you the trouble of being directed from the adhesive section to the paper area to the craft area and back to adhesives again.

Now, really, none of this should be a huge problem because rubber cement does exist and it is at a Michael's near my work. The problem for me is twofold:
1. I am cheap. There is no way I am buying glue at Michael's until it stops being on sale so I can use a 40% off coupon.
2. When I start a project, especially one that can easily be ruined by humidity, heat, moisture or liquids, I prefer to get it over with as soon as possible and whisk it to my parent's house where it will be safe. So far this has delayed me two days and likely will continue to delay me another 4-5. This is 4-5 days where, in my tiny house, myself, FI or two bouncy dogs might destroy hours of work and hundreds of dollars in the blink of an eye.

Anyone else have a DIY gone sour? If you are a DIY person... I know you have!

~Miss. Sunshine

Wednesday, April 11, 2012

International Day of Pink

For those of you who didn't know, today was the International Day of Pink. I might be spreading rumors here, but I am pretty sure it started several years ago in the Maritime provinces when a boy was picked on for wearing a pink shirt. The kids at the school rallied around him and all wore pink to show solidarity towards the boy and stand up in the face of homophobia. Years later and it is a huge movement that has spread, well, internationally!

At the school I work at we wear pink every Friday as a stand against bullying. By wearing pink, boys and girls alike, we show that it is okay to be who we want to be and that we will help those who are being teased or bullied. Phrases that are commonly used at our school include:
-"I'm weird, and that's cool."
-"There's no such thing as boy things and girl things."
-"We are all different and that's what makes us special."
-"I have the power of one and I can make a difference!"

Now, as you might imagine, we have had many people come in and present about the power of one, being weird, and bullying. Amazing presenters, for the most part.... except I teach Kindergarten. That's 3, 4 and 5 year olds. That is, in fact, a group of 30 of these children, most of whom do not have a firm grasp of English or a strong enough vocabulary to know words like "bully". These presentations often involve a lot of preparation ahead of time, a ton of discussion afterwards and a hope that there is something they might have picked up on. This doesn't, however, mean that we don't learn about bullying, gender stereotypes and being weird in our class!

I always start with the same book, My Princess Boy. For those of you who have never read this story, go to your local library and read it. It is incredible. I have never, ever had a student walk away without some idea that it is okay to be different and it is not kind to make fun of people who are different.

As a side note, the book was written by a mother about her boy, whom she fondly refers to as a "princess boy". He is 5 years old and likes to wear dresses and pink, but grown ups and kids make fun of him for wearing dresses and shopping at the "girls" section of the store. It hurts both of them very much. 

Amazing book!
As a result of discussing the hurt that the princess boy and his mother feel, we usually end up talking about things that we all have in common, but are often stereotyped, such as long hair, short hair, and wearing certain colours like pink, purple, blue and green. We even discuss favourite television shows, the types of songs we like and our favourite centres in the classroom. Usually by the end of this conversation, we have had, among 3, 4 and 5 year olds, a very meaningful talk about how it is okay to be different. Last year, we had a boy, who immediately went from making fun of boys wearing the tiara in the dress up area to throwing on a wedding dress, putting on "ballet" music and dancing as a princess across the room!

The Princess Boy dressed up as a princess reminds me of my young-un last year in his wedding dress. So happy!
As mentioned, today was pink day and the perfect chance for a refresher about what we do, especially since we have now spent a few months getting to know each other and are not afraid to talk about ourselves. Well, my heart warmed as we talked about hair and I heard girls shouting out that they had short hair and boys yelling that under their judah they had even longer hair than most of the girls. I was tickled when boys said they enjoyed playing with the babies at the drama centre and the girls said they liked building towers. We even had a friend who showed off his beyblade and we decided that a girl in our class was probably the expert at beyblades since she knew all their names.

So do my kids understand, fully, what "bullying" is? No. Not at all, actually. Do they know if they are a "bystandered" or get that they are different from everyone else, which is why they are special? No.

What they do know, is no matter what colour your skin, what god you talk about at home, what toys you play with, or what colour you wear, you are a person and you deserve to be included and treated with respect. What more could I ask for?

~Miss. Sunshine

Tuesday, April 10, 2012

When does it stop being fun and start being work?

There is this phenomenon that, as educators around the world, we see through every child's life. When does school stop being fun and start being work? Usually it is hard to pinpoint that moment in a child's life. Can you remember when you stopped enjoying learning and started learning because you had to? I doubt it.

Today, I had one of those moments where my heart ached as I learned when it stopped being fun for a recent former student.

I had a child, let's call her Anne, who spoke a language other than English at home. In her Junior Kindergarten year she didn't speak a single word and with me in her Senior Kindergarten class she all of a sudden started crafting sentences and speaking to be heard around January. It was a great break through and showed us all the wonderful learning she had been doing while she listened intently! We realized we had a very smart little girl on our hands who enjoyed things like counting, simple addition and even letter sounds. It exceeded our expectations and it was great!

This year that same little girl is in Grade One. I was talking to her teacher today about her and her teacher mentioned that she was falling behind because she writes like she talks-- as a child who does not have a firm grasp on English. She is falling behind because when other children write things like "I went to the park.", she will write things like "I go to park okay."

Now, this is very typical, and, frankly, to be expected, but I never really thought about how much support she would need in Grade One to learn things like tenses, how to form proper sentences and more. She started going to tutoring to help, but the tutor just had her copy our rhyming words and other words without working on the conventions of the language. So what happens to this little girl who needs help to learn English conventions? She certainly doesn't get hours of help each week to learn the conventions of the language shee needs to succeed, but let's now bring that to the governments attention-- the same government that is trying to cut thousands of support jobs with our budget. These support jobs are the things that help students like Anne who are extremely bright, but still learning English or French.

So I come back to the question: When does it stop being fun and start being work? My answer for this girl, is Grade One. In Kindergarten we didn't worry too much that she wasn't speaking in full, grammatically correct sentences because she simply spoke! Here, her knowledge was being tested every day and she was full speed ahead learning new things every day with her peers. In kindergarten we are thrilled when a child masters a skill-- even if that skill takes two years, but in the higher grades there is a tight  and well-scripted curriculum to follow and you either stay ahead or fall behind. The issue in these higher grade becomes, for example, if you miss out learning about counting by 5s, 10s and 20s in Grade 1, then you miss out on counting by 2s in Grade 2, and when you learn to multiply in Grade 3 it is difficult without being able to count by a number. By the time Grade 4 and 5 come around, you are doing harder and harder multiplication and division-- which is extremely difficult if you didn't understand the lessons on simple multiplication or counting by numbers earlier. The curriculum strangles our ability to freely teach based on interest, need, and individual learning speeds and styles because we feel strangled by this need to teach each unit in the few weeks we have before the school year ends, the best we can.

I think this is the new challenge the government needs to accept full on. Instead of compacting and jamming more curriculum into each year, why not say to the teachers, "It doesn't matter if it takes your students 6 days or 6 months, let's just see if we can continue to teach them about counting by a number."? I guess the answer is that we are so afraid that our students will not come out of the factory the same.

What if Johnny in reached Grade 5 and didn't quite have a grasp on area and perimeter but had a huge working knowledge of geometry and Anna got to grade 2 and didn't have a strong concept of printing, but could type with the best of them? Maybe Anna will grow up in a world where neat printing is no longer necessary and perhaps Johnny will start to learn about perimeter later when he becomes interested in finding the perimeter of his geometric shapes. We are so afraid of having a child lose out on a single piece of knowledge that we insist everyone has the same learning, and just lose some studnets on the way as casualties of the education system that we can't help because, frankly, we don't have the time or funding.

I doubt I will ever see it, but I would love to be able to see in my lifetime a school system that wasn't a factory spewing out students with the same knowledge given to them and categorized by grade, but a school system that teaches to interests, themes, topics, and is individualized to each student. How about a government who acknowledges the vital role that ESL and Special Education teachers play in helping students keep up with the ever more demanding workload we force on students as young as five? How about a government that, instead of just telling us that we are teaching "21st Century Students", helps us to do so by providing access to basic technology within each classroom? Maybe even a government that sees that each classroom is an intricate social network that requires different skills, methods and strategies every year, thereby requiring different resources and support workers?

One can dream...

~Miss. Sunshine

Monday, April 9, 2012

Why 'Mrs. Sunshine'?

I was saving this post for another day, but I thought it would be the perfect day to show Mr. Sunshine all about the wonderful things I write about him in here, and I thought there would be no better way to show him how much I think of him by writing about the story behind my name.

When I first thought about writing a blog (a few weeks ago now), I spent every morning and afternoon in the car trying to come up with a name. I didn't want it to be a name that made my blog about SOMETHING like "Mrs. Sunshine's Kindergarten" or "Mrs. Sunshine's Wedding Adventure" and I also wanted it to be something that I could use to document Mr. Sunshine and my new lives as newlyweds.

So I sat and thought and drove. Over and over and over again. Finally, after a few weeks, I sat down and had an "enough is enough" moment and decided to come up with something on the spot. As I sat at my computer desk I looked over to the empty hanger on the wall and remembered what was hanging there-- a card that was part of the proposal Mr. Sunshine had prepared for me. I smiled and started thinking back to the cards he wrote and how great a moment that ended up being.

In that moment I knew who I was. I was not my moniker from weddingbee or facebook or pinterest-- I was his sunshine. He is the only person who has ever given me that nickname and every single time he says it, my heart shines and beats like it will burst in my chest. How could I not be Miss. Sunshine, soon to be his Mrs.?

So there it goes....

How much do I love Mr. Sunshine? Enough to make him the most important part of my blogging journey..

~Miss. Sunshine

Invitation Sneak Peak!

Okay, so I promised a sneak peak, and, frankly, I want to brag! These invitations have killed me. Every time I come to a new job I announce, "This is the WORST and most BORING thing EVER!" and then I find something worse. Thank god I am only making 40 of them!

As a DIY invitation journey, I will tell you that this all started when my sister, who is an amazing graphic designer, volunteered to do my cards. I figured I could do it for pretty cheap and make it all my own, so I jumped right on that. Hundreds of dollars in paper and crafting supplies later, and I am thinking I should have just ordered some stock invites from a designer. That being said, here is the journey...

First my sister and I sat down and designed them. Fairly simple since I knew what I wanted and she knew what looked good. This took about 3 hours for me, including editing, but much longer for her.

Secondly, I made mock ups of the invitations using paper I had laying around the house. For the record, this was long, boring and pointless. It didn't actually give any sort of representation of the beauty of the invites.

After this, we went to the big city to a paper shop I mentioned before called The Paper Place. I still love it! Anyways, my sister thought we could go to the printers to print the invites, so recommended purchasing large 20 x 30 sheets of quality cardstock, as well as backing and envelope liner paper. I also managed to get some great envelopes! Three hours later, I was outta there!

Finally, my sister put everything into "print mode" (don't ask me... not a G.D.). I took some old paper and went to my mom and dad's near my bedtime in a desperate hope that our home printer would work since the printers had quoted me over $25+tax PER PAGE! It worked and this meant "worst job ever" 1 came next...

Because I printed the sample on Tuesday and Friday was a holiday, I needed to now cut all the large sheets of paper we had purchased into 81/2" by 11" sheets so it would fit in the printer. Problem was that the only paper cutter I have access to is at work/school, and because of this, I needed to do it all before I went home on Thursday. I also had a meeting before school, at lunch and after school on Wednesday and on lunch on Thursday. As you can imagine, not much time. I also discovered that the best way to cut the paper to get the most for my money was to cut it lengthwise first (11" by 9"), then cut the 11 inch wide section into 3 sheets and the 9" section into 2 sheets. Because the paper cutter was not big enough to do this, I had to hand cut 30 sheets of paper in half before bringing them to the paper cutter, then had to recut all those sheets accurately at the small cutter. Four hours. Seriously.

Have I convinced you this is a bad idea yet? No? Let's keep going...

So I took that paper to my mom and dad's on Sunday and printed everything! I had to wait at the printer for each paper and move it away from the printer as soon as it was done so that the ink wouldn't smear. Gah!

Here's a picture of that, buy the way...
This printer printed out almost 150 sheets and only died on the last 15. RIP printer...


It looked great... but now I had to cut out each paper, again. I had purchased an awesome Friskar's paper cutter to do this, but because the cardstock is so heavy duty, about 1/2 way through the blade was dull. Being gung-ho, I actually cut with the dull blade and then trimmed the edges with scissors to make them cleanly cut. (Reading this back, I seem insane).

Now we come to today.

So I got up early and realized I was too early to head off to Michael's, so I decided to finish off the gems on my direction and RSVP cards. My sister and I had picked up some self-adhesive rhinestones and I figured it would be a quick task.
Crafting supplies from hell.

You might notice that there is E-6000 glue, toothpicks, tweezers and rhinestones in this picture. That is because these $10 adhesive rhinestones are not adhesive. I am pretty sure I threw a tempertantrum and jumped up and down when I realized that.

After two hours of putting glue on paper, picking up a rhinestone with tweezers, spreading glue on the rhinestone with a toothpick and letting it set on the card, I had 40 of these:

So sparkly and demanding that you send it back!


I swear...

So anyways, managed to go Michael's and grab some new blades for the paper cutter as well as some sealing wax. I came home, got into "let's do it!" mode and tada! One pocketfold created and one invitation is officially complete...

Ohhhh!!!! Ahhhh!!!!

And the cover of course...

The cover still needs to be glued onto backing paper, which is uncut and at my parents, but one thing at a time here!
 So hours and hours later, I have finished almost ONE invitation and I am so proud! It looks fantastic! I showed Mr. Sunshine who said "Umm... it's nice.", but he certainly didn't share my enthusiasm.

All in all, I would estimate that this invitation project will take me close to 20-25 hours to do the 40 invitations and another 3-4 to do the calligraphy on the envelopes.

Would you do it?

~Miss. Sunshine

Sunday, April 8, 2012

Dinner with my parents

It's that time again! My mom always puts out the same meal (and no complaints for me!) for all major holidays; Easter, Christmas and Thanksgiving. I know every year I can count on her special mashed potatoes, sweet potato casserole, turnip casserole (although that has been fewer and far between as no one really likes it), peas and turkey and/or clove and beer ham. I love it! Have I mentioned how much I enjoy stability and routine? I think that if, for one year, I were to not have that pre-stuffed, frozen Butterball turkey with a huge side of stuffing and mashed potatoes the rest of my year would be shot.

Anyways, Easter always ends up being a special time for us, not for religious reasons, but because my sister was born on April 13. Usually this means that her birthday is right around our Easter dinner and we are able to see our relatives on her birthday week. In the last year or so these family holidays have become more important because my mother has been insisting on inviting Mr. Sunshine's mom and his brother that lives with her. It's truly heartwarming to see how well they have been accepted into our quirky little family. I think on one level my mom really relates to the future mother-in-law because both of their families live on the other side of the country. I know these times can be lonely for my mother, and perhaps for future MIL as well.

Well, this holiday is going to be exciting because we are switching dessert from our traditional pie, compliments of our local farmers market, to my famous Rocky Road Cheesecake. I started making this every year for my sister's birthday a few years ago and she loves it! I posted yesterday about how sick I was feeling and how kind Mr. Sunshine was as he ran out and getting the proper ingredients. While last night around 7pm I downed some Tylenol, took some decongestant, drank some water and waited 30 minutes. When the shivering death feeling went away, I got right on making that cheesecake! Mr. Sunshine thought I was crazy and told me to wait it out, but I knew that if I waited a minute more to start I would be dying by the end.

All I can say is that this was the worst cheesecake making experience to date, and I have made this exact cheesecake at least 15 or 20 times.

For the record, the only times I ever have to make something right away that Mr. Sunshine doesn't know how to, is when I am quite sick. He will certainly remember the mini lemon cupcake fiasco for his potluck at work this past February! This means that I am left alone and he can't do anything except say, "Um... maybe you can fix that?"

Anyways, I crawled into the kitchen and started on everything as quickly as I could, reading the recipe over and over to ensure I didn't forget anything. Then disaster struck-- I had accidentally picked up no fat cream cheese instead of low fat cream cheese. Now, anyone who has ever ate a cheesecake knows the fatty rich taste and texture is key! As I poured it in and beat it, the cream cheese, which was still cold from the fridge (supposed to be room temperature, but what can ya do), literally made the sugar and cheese mix look like melted ice cream. I knew I was in trouble right then. The second disaster struck as I went to fold in the melted chocolate and it clumped into the cheese mixture in little dots, giving this chocolate cheesecake a grey colour. Appealing, no? Finally, as I went to put it over the cookie crumb crust, the whole mixture poured out of the bowl like soup. Did I mention it was supposed to have the consistency of a thin paste? Good lord, I knew I was in trouble! As I baked it 5 minutes less than normal, it came out fully cooked (and possibly over cooked) with the sides a very golden brown. I doused the top with more caramel, pecans, chocolate and marshmallows than normal and prayed.

When I pulled it out of the oven it looked gorgeous... since I had hidden everything under the marshmallows. I knew I had to call my mom.

I called her and told her that I was about 99% sure this cake was garbage. Either the colour inside, the texture, the taste-- something was going to be horrible. We agreed to buy a spare pie from our local farmers market that, thank god, is open Easter Sunday for all of us who can't bake.

So will this Easter still be exciting? For sure. We are still going to have our usual spread and we have a back up dessert. Am I ever going to forget the time I destroyed this stupid cake? Probably not-- and neither will my relatives, but where would we be without reminiscing every year about that time we ate the saltiest turkey known to mankind, or the year where we cooked the turkey upside down and it tasted fantastic, or even that time where the turkey was done four hours before we wanted it to be and my mom nearly had a panic attack?

What stories do you have about the holidays? What traditions do you keep?

~Miss. Sunshine

Saturday, April 7, 2012

How I know it's love...

Around noon Mr. Sunshine asked me if I had everything for my outfit for our engagement pictures next weekend. Of course I had forgotten about this (how he had remembered... well god bless the man). Anyways, he asked if I wanted to go to a local city that has a great "cowboy" boutique. I had popped some advil for a migraine and was ready to go.

Then came death.

Or sickness.

Really depends who you ask. *teehee*

Anyways, what then happened was 30 minutes of me sleeping in the car, Mr. S prodding me along and asking if I was okay every few minutes as I stumbled through the main street of the town towards the store, and finally me relenting and begging to go home. 30 minutes of sleeping later and he woke me up at the local grocery store because I had to grab some ingredients to make my sister's cheesecake for our family celebration of Easter and her birthday. Damnit!

At this point I was pretty much zombie like and Mr. Sunshine's jokes were not going over well. He said that since the store did not have all the ingredients we needed, he would drop me off at home and pick them up. I volunteered to go with him, feeling bad he was doing all this and I believe his exact words were: "I'm not asking if you want to be dropped off. I am dropping you off. Please don't come with me!"

An hour of sleep later and Mr. S came home with the wrong ingredient and some soil for his plants. Gah!

But you know how it is love? After putting up with my insanity and watching me crawl out of bed to attempt to make the cheesecake (followed quickly by, "nooo... tomorrow.... gah.... beddddd....") he made me food, got me a drink, offered to grab me some Tim Horton's chicken noodle soup and went out to get me the right ingredients so I can attempt to make that cake tomorrow.

What a man!

~Miss. Sunshine

DIY Wedding Invitations

Now, I have to tell you, before I start this post, that I originally envisioned a wedding with no more than 30 people, casually talking, vintage themed, no dancing, maybe only a cocktail hour and the invitations were certainly going to be either a box kit from Michael's or printed from vistaprint.

I must say, I think I must have been in my own world when I came up with this dream because my mom wants to show me off (see: lots of friends!), my sister is a graphic designer (see: only the best will do!) and of course everyone wants dancing!

Now back to wedding invitations. When I first set up a budget for this wedding I put a set amount in wedding invitations and I am desperately trying to stay there now. There are so many hidden costs that it is unbelievable! First was the quality paper from an amazing boutique in Toronto called The Paper Place (highly, highly recommend them!). Second was the small details to add on to the invitations like the ribbon slides, quality ribbon, swaroski crystal stick on gems, and envelopes. Finally there was the good quality paper cutter, the boning mat (I skipped out on that thank god!) and postage! I haven't even got to the parts where I was too cheap to buy it made.

Because I was so insistent that for 50 people I would not spend more than $300 on all my paper needs, I have had to take on a lot. And by a lot,  I mean "thank god I only have 50 people!". First was our discovery that pre-made pocket folds were going to be about $2 each including shipping, no matter where we got them from. Second was the discovery that where you order your pocket folds from you need to order your envelopes from because designer pocket folds that say 5" are actually closer to 5.75". Oh... and did I mention those envelopes are $2 as well? And of course, if you have one kind of envelope for the outside you will need the matching envelope for the RSVP, and possibly the inner envelope if you are doing that at another $2 each. Right there, without anything else, would have blown my budget so far out of the water that I would be a sinking ship.

So here comes today.

To save money (and possibly to warrant a visit to the nearest psychiatric hospital) I decided I would hand make my own pocket folds and envelope liners, and print our invitations at home. While this allowed us a savings of hundreds of dollars, it then meant I had to go buy the paper cutter. I love Michael's 50% coupon days! So today will be a day of printing and screaming and praying that everything goes right. If you hear vile language that would make a sailor blush somewhere near my parents, you know that is just my sister and I screwing up while printing or cutting and my mental math counting how much more money this will cost us.

When it comes down to it, my DIY invites will end up costing about $5 each. They are custom made, match our wedding to a tee and are better quality than those you would end up seeing at Michael's in their boxed cards.

Is it worth it? I'll reveal one later this week and you let me know...

~Miss. Sunshine