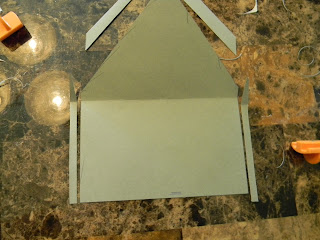
Anyways, for your pleasure and amusement... DIY Envelope Liners!
You Need:
-nice, thin paper (I used a rice paper)
-dry glue roller
-sharp scissors
-pencil
-envelopes+ 1 extra
-ruler or straight edge
-paper cutter (if you are lazy like me!)
 |
| The pieces of this puzzle. |
Take your spare envelope and cut a thin, thin strip down each side so that your envelope folds apart. Mark where you want the envelope liner to go down to (I put it about an inch below where you can see it) and using your ruler or paper cutter, cut straight across. You can see in my picture where I used a pen to mark a quick guideline for where I wanted it to be below. Next, cut about 1/4 inch off each side of what is left. You will not want the envelope liner to touch the edge of the envelope. Finally, cut off the "glue" at the top. Tada! Perfect template!
Step Two
 |
| Super lazy man's way to do anything wedding related. |
 |
| Yeah, nail. You sexy foldin' that liner. |
Grab an envelope, liner and the dry glue roller. Put a line of glue just below the fold crease where it is visible when the flap is open. Carefully (so carefully!) puff open your envelope and slide in the liner. ENSURE THAT THE LINER IS RIGHT SIDE UP *oops!*. Line up the liner with the glue line on your envelope and carefully press to secure. Fold the flap back and put another triangle of glue around the glue line where your liner will touch. Carefully press to secure. Fold your flap back halfway and use your nail or, for the fancy fellows, a boning tool to create a proper crease. And that's it!
Super simple. Tips and tricks I have figured out:
- Make sure you trace on the BACK of your paper. That way if there is a small pencil line left, no one will see.
- Ensure you have a sharp blade on your cutter.
- Putting the glue both directly above and below the fold will decrease wrinkling significantly.
- Some of your envelopes will have misplaced glue, forcing you to choose between going directly beside the glue or over the glue. Make a choice and make it well.
For those who are curious, one "before and after" picture.
 |
| Before |
 |
| After |
I agree. It's so much nicer :)
~Miss. Sunshine
No comments:
Post a Comment